

Table of Contents
Introduction
Lensmeter, lensometer, focimeter or vertometer. It is a microscope, which is used to measure the back focal length of the lens. The lensmeter is essentially a centred telescopic optical system aligned with a standard optical lens and a rotatable target illuminated by a light source. It measures the focal length of a lens and converts it into diopters on a circular number line called a Power Drum.
Parts of the manual lensometer
- Eyepiece
- Reticle Adjustment Knob
- Prism Compensator
- Lens Marker
- Gimbal (Lens Holder)
- Eyeglass Table
- Magnifier
- Axis Adjustment Wheel
- Filter Control
- Inclination Control
- Power Drum
- Eyeglass Table Control

Lensometer Parts Description
1. Eyepiece
The eyepiece must be adjusted to zero out the lensometer for their Rx. This is done by
turning the eyepiece counterclockwise to the most plus setting and then slowly turning the eyepiece clockwise towards the minus until the reticle comes into focus.
2. Reticle Adjustment Knob
AKA Chrome Knurled Sleeve
3. Prism Compensator
Lensometers have an attached rotary prism that allows the operator to dial in 0 to 25 diopters of prism anywhere from 0 to 360 degrees. Some older model lensometers do not contain a prism compensator but do have a ledge that allows the use of auxiliary prisms usually in increments of 3, 6, and 9 prism diopters to help neutralize high amounts of the prism.
4. Lens Marker
The lens marker is a simple device consisting of three spring-loaded pins that dip into a water-soluble ink to mark the lens horizontally with the center pin marking the direct point being read through the lensometer. Note that the lens marker pins and ink pad can be replaced and the ink pad requires occasional re-inking.
5. Gimbal (Lens Holder)
The lens holder is the arm that swivels into place to hold the lens or frame
stable while taking a reading. The circular piece on the end that swivels and has legs that touch the lens is referred to as a gimbal.
6. Eyeglass Table
The eyeglass table is used to keep a frame-mounted and the lens aligned properly for measuring the correct axis of the lens. The table often bisects a scale mounted on the lensometer body used to measure the height of the optical center.
7. Magnifier
Some lensometers have this optional component which allows the operator an easier view of the axis wheel by magnifying the scale.
8. Axis Adjustment Wheel
The axis adjustment wheel allows the operator to align the primary and secondary power meridians in the lensometer. This is done by spinning the mires inside of the lensometer body.
9. Filter Control
The filter control is a small knob used to apply a green filter to the lensometer lamp for a more comfortable view through the clear material while allowing this same filter to be removed for a brighter view of filtered lenses.
10. Inclination Control
The inclination control is used to loosen the lensometer body from the base, this allows the operator to adjust the viewing angle of the lensometer for easier viewing.
11. Power Drum
This wheel is usually incremented in steps of 0.12 diopters, with higher powers being incremented in steps of 0.25 diopters.
12. Eyeglass Table Control
The eyeglass table control is used to move the eyeglass table to align the frame-mounted optics.
How to focus a lensometer
- Position the instrument for comfortable viewing (use locking lever on side of the instrument).
- Turn the eyepiece counter-clockwise until it stops. (BE GENTLE!)
- Be sure the prism compensation device is at 0° and 90°, or be sure no prism rings are in place.
- Place the clean sheet of white paper just ahead of the lens stop, in place of the lens, so it reflects light into the instrument.
- Place eye to the eyepiece and slowly turn eyepiece clockwise until RETICLE is in focus (watch the “1” on the prism rings). DO NOT TWIST EYEPIECE BACK & FORTH.
- Remove the piece of paper.
- Turn on the lensometer.
- Turn power drum to the high plus area (+10.00) Look into the eyepiece again and turn power drum SLOWLY in the minus direction until the reticle is clear and the target is in focus. Do not rock drum back and forth; just turn it until lines (or “1” inside reticle are clear.
- When the reticle is clear and the target is in focus, the power drum reading should be 0.00. If the power drum reads 0.00, the lensometer is in focus for your individual use (If the power drum is not at 0.00, try again. If you wore your glasses the first time, remove your glasses and try again. If you repeatedly are off 1/8 diopter, compensate by correcting + or – 1/8 diopter amount of each lens) checked
What we see in a lensometer
Reticle
The reticle, the guide displaying numbered rings shown in the drawing below, is seen when looking through the eyepiece. It allows you to place the lens’s optical center in the correct position, allows the displacement of the optical center for filling prescriptions that require prism and can be used to check axis positions in sphere cylinder lenses for verification. The rotational position of the reticle can be moved by turning the chrome knurled sleeve.
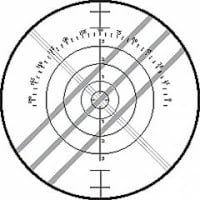
The “Target”
The centre of the reticle is a small circle. The circle has lines that divide it into perfect quarters. You use the lines and the center circle to assure that you have the lens’s optical center correctly positioned in the lensometer for accurate verification (or layout) results. When the point where the sphere lines and cylinder line cross each other is perfectly centered within the circle, the lens is said to be on target. The center of the target is where you want your sphere and cylinder lines to cross when Rx does not require a prism.
Prism value
Prism value rings are given in 1,2 and 3 diopters. If you could draw a straight line vertically and horizontally through the center of the target you would have a guide for UP, DOWN, IN, and OUT prism.
Axis position line
This is the line that moves when we turn the chrome knurled sleeve. It is not necessary to move it but it helps you bring a lens in target and on centre at the correct axis.
Operating Instructions for Manual lensometer
- Set the lensometer on a stable surface. Adjust the height of your chair and the angle of the lensometer so that you can easily see through the eyepiece on the lensometer.
- Turn the eyepiece slowly counterclockwise until the black cross becomes completely clear to focus the eyepiece on the display area.
- Rotate the measuring wheel to set the scale at zero. The dividing line in the center of the display area should be at its clearest at this setting.

- Turn the power wheel to its highest power for the best light infiltration and focus through the eyepiece.
- Set the right lens of the eyeglasses on the seat of the lensometer with the front-facing up toward you. Gently release the pressing piece on the seat so that the feet of the piece hold the lens in place. This will ensure that the lens will not shift while you work, but will not apply so much pressure as to damage the lens.
- Rotate the measuring handwheel so that the dividing line is at its clearest. While you work on this focus, shift the lens side to side so that the dividing line and the centre of the black cross line up. You must move these two pieces simultaneously to accurately bring the lens into focus for measurement.
- Read the scale at the point where the dividing line crosses the scale. This reading gives you the spherical diopter or the outer power of the lens.
- Turn the power wheel to lower the power slowly. As you do this, the dividing line will go out of focus and two other similar lines will move in and out of focus. Turn until the third line is completely in focus and read the scale.
- Subtract the second reading from the first to determine the cylindrical power of the lens, which is the inner power.
- Remove the right lens and readjust your eyepiece and setting as you did in the beginning. Repeat all steps for the left lens.
Marking the optical centre
1. Check that the center of the lens coincides with the centre of the target.
2. When this is so, the lens is correctly positioned and the optical centre could be marked.
3. While there is no centre dot, the whole set of dots can be ‘framed’ within the lines of the graticule to locate the centre.
4. Repeat the same procedure for the other lens.
Lensometry
Definition of Lensometry: It is a device designed to measure the refractive power prescription of unknown lens.
“Lenso” = lens
“Metry” = measurement of
Purpose of lensometer
- Neutralizing a pair of glasses
- To determine the prescription
- To determine the spherical power
- Determine the cylinder lens power
- Mark the optic centre
- Measure the amount of prism in the lens.
Measurement of Bifocal Power by manual lensometer
- Measure the distance portion of the bifocal lens, in the same way as with a single vision.
- Find the distance power.
- Find the near power.
- The add, or reading correction, is the algebraic difference between the distance reading of the sphere power and the reading portion of sphere power.
Thanks a lot for this very important things.